Description
The module « Measures » is the main element of the application GWA. It provides the information necessary for network analysis.
Prerequisites: To start measurements, we must first have defined the context in which the measures will be implemented (i.e. the environment, the location and the APs – please refer to parts III and IV for additional details).
To prepare a series of measurements, the user must, in this order:
- Select the environment where the measurements will be performed
- Select the place where the measurements will be performed
- Create and select the campaign which will include measures
- Enable / disable various options related to measures: force the ESSID or AP, flow measurements, scanning the environment…
This part presents to the user the various windows met in this module.
The environment selection
Select the environment where the measurements will be performed.
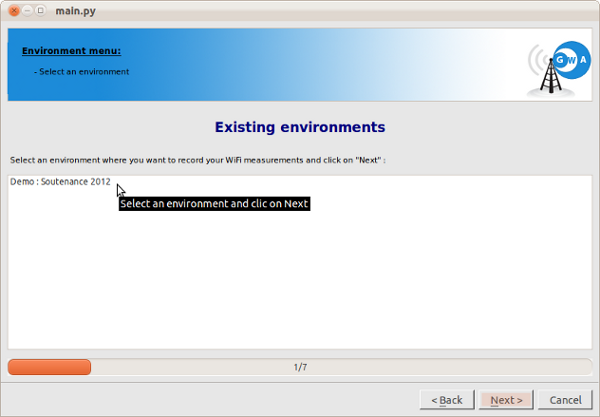
Note
It is mandatory to select an environment to continue the process.
Select a place
Select the place where the measurements will be performed.

Note
It is mandatory to select a place to continue the process.
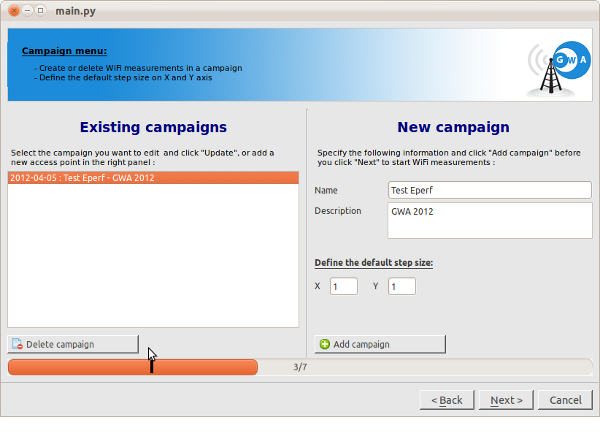
Selection of a campaign
This window allows you to manage campaigns, including:
- The creation of a new measurement campaign
- The selection of an existing campaign
- The suppression of campaigns
Creation of a campaign
Before the start of each measurement, it is advisable to create a new campaign. The following elements should be specified:
- The name of the campaign
- The measurement step, the distance (x and y) between each measures.
- A brief description of the campaign (optionnal)
Click on “Add” to complete the addition.
The new campaign will appear in the list on the left. => Select a campaign to go to the next step.
Warning
It is strongly recommended to create a new measurement campaign for each use of GWA. Otherwise, the user may overwrite the information of previous measurements.
Suppression of a campaign
The list of campaigns allows, besides selecting the deliberate campaign of measures, to delete it.
- Click on the campaign to remove.
- Click on the button “Remove the campaign”, and then confirm your choice.
Forced connection option
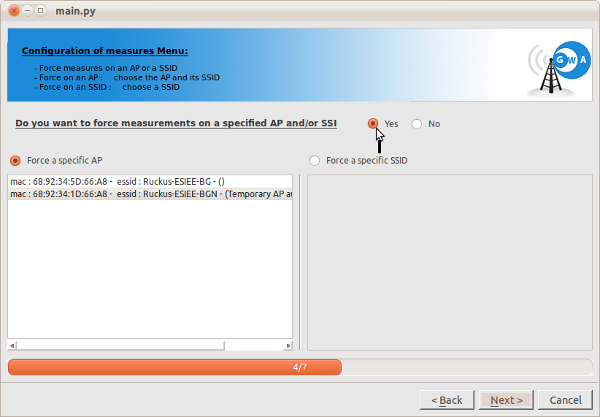
GWA offers two additional options for the achievement of measures:
- Force the wireless card to connect only to one access point during measurements
- Force the connection to an SSID and do not change if the card detects a known network with a stronger signal
Force the connection to only one AP
It may be interesting to restrict the measure to a single AP. To analyse its influence independently.
- Choose the option “Force measurement on a specific AP”.
- Select the AP from the list.
Access points available depend on the place previously selected for this campaign. Only APs located in this place are displayed. For now, this feature is somewhat limited but should be improved in future releases.
Note
If the position is too far from the AP and receives a signal too weak for it, NIC returns to automatic mode and will connect to the AP with the best signal.
To reduce the probability of encountering this situation, open a terminal and type the following command:
sudo iwconfig [interface] sens -100
Force the connection to an SSID
This can be interesting if the user is in a multi-SSID environment. Multiple SSIDs already connect to the card are detected. In this case, the card can automatically change to an SSID which has a better signal level.
- Choose the option “Force Connection to an SSID”
- Select the SSID from the list.
Note
This option is not compatible with all WiFi network cards. It may be conflicted with some WiFi management applications on Linux: It is recommended to configure the connection to the SSID before.
In case of problems for a return to the normal connection, open a console and type the command:
sudo iwconfig [interface] essid any ap any
Scan the environment and Eperf
In this section, two options are presented. The windows presented below the configuration of the following options for measurement data:
- Scan the environment Wifi
- Flow measurement Eperf
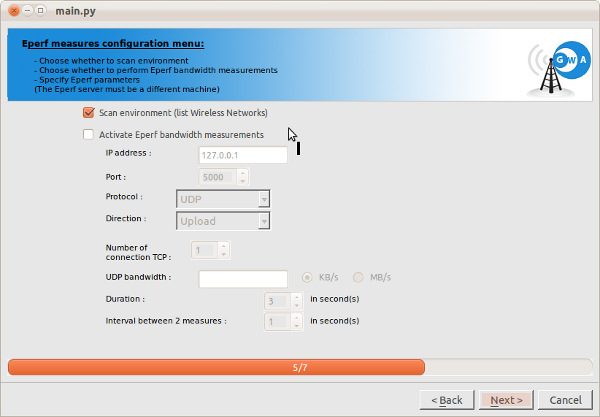
Scan the environment
The environment detection option allows during each measurement to scan the environment in which we are located. This scan can highlight any WiFi jammers on the transmission channel of the AP or on an adjacent channel.
- Check “Environmental Scan” if you want to do it at each measurement.
Eperf flow measurements
The Eperf option allows performing flow measurements in the WiFi environment. This option requires an Eperf server running on another machine connected with Ethernet cable to the AP (this also works with Wifi connexion, but can distort the result).
Eperf server configuration: If Eperf is not installed, get the “eperf” directory on the GWA package. Put it on another machine and run the “install_eperf.sh” as below
chmod u+x ./install_eperf.sh
./install_eperf.sh
After, you can run eperf server
eperf -s
For more information about using Eperf, visit the following page.
You can find the IP address of the server after running the eperf server
eperf -s
Interface --> lo  IP --> 127.0.0.1
Interface --> wlan0  IP --> 192.168.0.28
server TCP  port : 5000
server UDP  port : 5001
Server has been created !
Configuration in GWA :
- Check the box to enable « Eperf – flow measurement ».
- Set the IPv4 address of the server in the format XXX.XXX.XXX.XXX
- Choose the total time of Eperf test (warning: The longer test is the more time the measures will take).
- Choose also the interval between measurements.
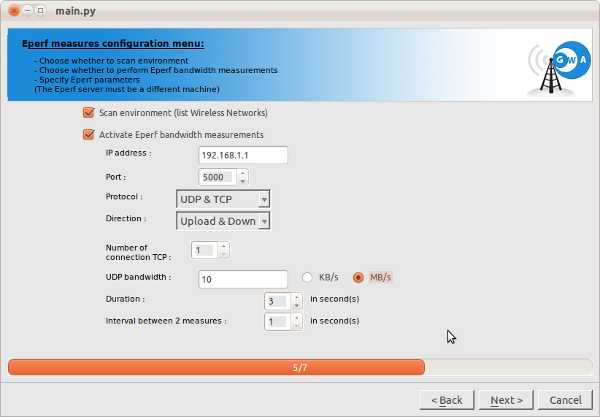
Eperf explanation
By default, flow measurements are performed in TCP protocol. This has the advantage of estimating the maximum flow transmitted between client and server. With UDP, disconnected mode, the desired flow is forced.
To use the UDP protocol:
- Check « UDP ».
- Complete the field “flow” by specifying the unit (Kbps or Mbps).
The measure realization
On the measures page, the room is represented in 2D to allow the user to monitor measurement progress.
Note
When reusing a previous campaign, the previously measured points are not marked on the map (red and green circles). The new values replace the existing ones found in the database for the points made before.
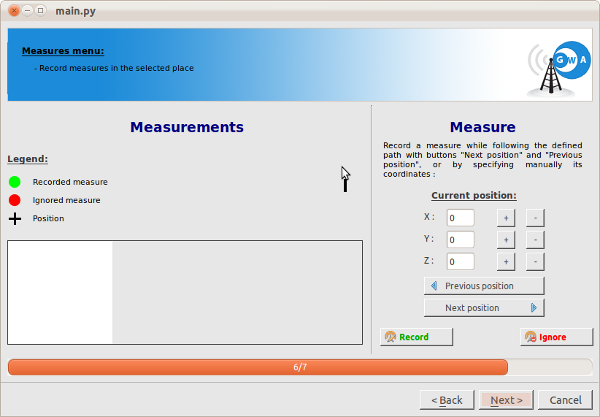
The displacement means
Several means are set to move the cursor position across the interface:
- The buttons « + » and « - » of x, y and z coordinates are used to move manually in the plan.
- The buttons “Next position” and “Previous position” increments and decrements the value of x (horizontal). At the end of the line, the y-axis (vertical axis) is incremented. The cursor continues in the other direction, which decreases the value of x (horizontal axis) up to x = 0 again. The cursor goes through all the points of the place that way.
- For each measurement, the pointer will advance to the next position depending on the path specified before.
Note
The keyboard input coordinates into the fields x, y and z is not effective. Do not use the keyboard input, but the buttons available on the interface.
Possible actions
Two actions are possible at each point of the plan. The choice is left to the user:
- Perform the measure with the button « Relever »: signal level and other depending on options selected above ==> A green circle will appear if the measure was carried out correctly.
- Otherwise, a red circle is drawn.
- Ignore the measure with the button « Ignore » : signal level and noise level to -256dB ==> A red circle is drawn on the 2D plan.
The exceptions encountered
During the campaign, it is possible to have exceptions that do not allow to achieve a measurement correctly. These exceptions are handled by GWA. In most cases, the user will have a warning message. In this section are presented the “special cases” which the user may face.
undeclared AP
For each measure, the connected AP is specified in the database. If an AP has not been declared via the module “Management of APs”, but is detected at the time of measurement, an automatic addition is proposed to the user.
If the automatic addition is approved, the new AP set is described as an « AP temporarily added » and is positioned at the point (0,0,0) of the common room (where measurements are made).
To change the characteristics of the created AP, see Part IV – Management of APs – 4. Update a temporary access point.
Unassociated AP
During the measurement campaign, the card may disconnect from the WiFi network. The MAC address of detected AP becomes “Not Associated” for the system. The AP is not created in the database. The same warning popup is displayed as before. It asks the user whether to add the fictive AP in the database.
Validate the addition if you also want to keep the coordinate points for which the card is not connected to WiFi. If the addition is not validated, the measure is not raised at that point.
Fictitious AP
When creating a campaign, a fictional AP is added to the common room, if it does not exist. The AP’s role is to regroup the measurement points deliberately ignored by the user during the campaigns performed in this place. The AP is defined with the SSID ‘AP_ignored’ to refer to measures ignored, and with the MAC address defined as follows: “AP_idLieuCourant.”
When the user ignores a mesure, the insertion made in the database to the point current with coordinates (x, y, z) is:
- AP connected: identifier of the AP as having description ‘AP_ignored’ in place
- Signal statement: -256 dB
Ignored measurement points this way can be identified during extraction for example.
The end of the measures
- After the measurements, click on “Next” to finish the campaign.
The last page allows to go to the extraction module directly via the button “Switch on the interface to extract data in XML.”
- Click the button to extract data or click on “Finish” to complete and exit the module “Measures”.